Building a Role-Based REST API with Laravel Sanctum
by DevsrealmGuy
We will learn how roles and permissions work in Laravel Sanctum. At the end of this guide, you will build a multi-user REST API with in which resources are scoped by the user role and their permissions. The code for this guide is available on GitHub.
Introduction
Laravel API authentication can be a bit tricky, and dealing with scope-based access can even be a bit challenging but don't fret it, with Laravel Sanctum it's a piece of cake.
In this guide, you'll learn how to implement a role-based authentication system in your app using Laravel Sanctum. Furthermore, the full source code for this guide is on GitHub.
Prerequisites
- Basic knowledge of PHP and Laravel
- Any API Tool i.e Postman, Insomnia, hoppscotch, etc. I'll be using Insomnia for this guide
- PHP Composer installed
- Web Server i.e Nginx, Apache2, Caddy, etc
What is Laravel Sanctum
Laravel Sanctum is the Laravel team's first-party package for API token authentication. It issues lightweight API tokens, and each token can carry abilities (scopes you check on every request), which is what makes it a natural fit for role-based access control. Sanctum ships with Laravel and needs no OAuth server to run.
Sanctum authenticates a basic token API, a SPA (Single Page Application), or a mobile application.
In this guide, we would be looking into the API token portion of Sanctum, like issuing a token, coupled with the authentication and authorization part of it. Before we get into the nitty-gritty, I think it is a good idea to understand why we are using token-based authentication in the first place...
Why use a Token Based Authentication?
Typically, with HTTP basic authentication, user agents usally provide a username and password to prove their authentication.
The good thing about this approach is, it's stateless, that is, no cookies or session IDs are stored on the server, and as such, there's no need for complex setup, the HTTP header handles that for you.
The downside with this approach is that you won't only have to type in your user and pass each time you need to authenticate yourself but you also need to make sure the process is strictly enforced throughout the entire data cycle to SSL for security, otherwise, you might be subject to a man-in-the-middle attack where an attacker can simply capture the login data and do all sort of wonders with it.
Even if you are using SSL, you'll still have to authenticate with a username and password for each protected resource which isn't ideal if you want to have a bit of security, and that brings us to token authentication...
With token-based authentication, for you to prove you are authenticated, you need to be issued a token either by a system administrator or you need to generate one for yourself assuming your account is associated with the system, think GitHub Personal Access Token.
The advantage of this is that users won't have to rely on entering their user and pass each time they need access to certain resources, plus you as an issuer can enforce strict guidelines on how the token can be used on your end, things like Rate Limiting an API query, scoping access, expiring the token after a certain time, and more. The good thing about all of this is that Laravel Sanctum can handle most of this for you, so, let's get into practice.
Laravel Sanctum vs Passport
Both are official Laravel packages, but they solve different problems. Sanctum is a lightweight token issuer with no OAuth and minimal setup, built for first-party APIs, SPAs, and mobile apps, which covers the large majority of applications. Passport is a full OAuth2 server: reach for it when you need third-party clients to authorize against your API with authorization codes, client credentials, and refresh tokens.
For the role-based API in this guide, Sanctum is the right choice. You get token authentication plus per-token abilities without standing up and maintaining an OAuth server.
Building the Role-Based API with Laravel Sanctum
Let's get started with Laravel Sanctum. You can check out the full source code on GitHub.
Step 1: Setting Up a New Instance of Laravel app and Sanctum Package
Create a new instance of a Laravel application by running the below command in your terminal:
composer create-project --prefer-dist laravel/laravel simpleblog
The above command would install a new Laravel application, and create a folder simpleblog containing our Laravel application.
Be sure to change your current directory into the new app folder when the installation succeeds.
Now, we install Sanctum using the following command
composer require laravel/sanctum
Update our
.env
file with your database information, and before going further, add a role
column to your user migration file, the up function should look like so.
                public function up()
                {
                    Schema::create('users', function (Blueprint $table) {
                        $table->id();
                        $table->string('name');
                        $table->string('email')->unique();
                        $table->timestamp('email_verified_at')->nullable();
                        $table->string('password');
                        $table->tinyInteger('role')->default(1); // <---- add this
                        $table->rememberToken();
                        $table->timestamps();
                    });
                }
Then publish the configuration and migration files of Sanctum, respectively, like so:
php artisan vendor:publish --provider="Laravel\Sanctum\SanctumServiceProvider"
php artisan migrate
The Sanctum configuration file will be placed inside your config directory, and personal_access_tokens table (the table the tokens are going to be stored) would be created in your database with the following columns:
+----------------+---------------------+------+-----+---------+----------------+
| Field          | Type                | Null | Key | Default | Extra          |
+----------------+---------------------+------+-----+---------+----------------+
| id             | bigint(20) unsigned | NO   | PRI | NULL    | auto_increment |
| tokenable_type | varchar(255)        | NO   | MUL | NULL    |                |
| tokenable_id   | bigint(20) unsigned | NO   |     | NULL    |                |
| name           | varchar(255)        | NO   |     | NULL    |                |
| token          | varchar(64)         | NO   | UNI | NULL    |                |
| abilities      | text                | YES  |     | NULL    |                |
| last_used_at   | timestamp           | YES  |     | NULL    |                |
| created_at     | timestamp           | YES  |     | NULL    |                |
| updated_at     | timestamp           | YES  |     | NULL    |                |
+----------------+---------------------+------+-----+---------+----------------+
9 rows in set (0.001 sec)
You don't have to know the table columns to use Sanctum, the above is simply a depiction of how it looks.
Lastly, add the Laravel\Sanctum\HasApiTokens trait to your User model,
and replace the $fillable property with the following:
                use Laravel\Sanctum\HasApiTokens;

                class User extends Authenticatable
                {

                 use HasFactory, Notifiable, HasApiTokens;

                 // --------------------------------↑

                 protected $fillable = [
                    'name',
                    'email',
                    'password',
                    'role'
                ];
By doing this, we can use the createToken() method of the HasApiTokens trait to issue tokens.
REST API Endpoints
The permission model would work in such a way that a user can have a specific role with which they can access resources if and only if the resources allow that role. This gives you the ability to control what users can do and cannot do with the API.
To keep things simple, we would be creating the following REST API endpoints and roles:
- GET /posts (list all posts) - Only Admin have access
- GET /posts/:id (get a post) - Only Admin, Writer, and Subscriber have access
- POST /posts (add a new post) - Only Admin and Writer have access
- PUT /post/:id (updating a post) - Only Admin and Writer have access
- DELETE /posts/:id (delete a post) - Only Admin and Writer have access
- POST /users/writer (add a new user with writer scope) - Only Admin have access
- POST /users/subscriber (add a new user with subscriber access) - Only Admin have access
- DELETE /user/:id (delete a user) - Only Admin have access
To make this a bit realistic, the first user that registers would take the Admin role, and the Admin user can then create more users with lesser permissions e.g writers, subscribers, etc.
Create the Posts Table
Before we go over the steps, create a post table, start by creating the migration and model like so:
php artisan make:model Post -m
and add the following in the up function of the posts table migration
                    public function up()
                    {
                        Schema::create('posts', function (Blueprint $table) {
                            $table->id();
                            $table->string('title');
                            $table->string('slug')->unique();
                            $table->longText('content');
                            $table->timestamps();
                        });
                    }
This is a simple post table to keep things simple. Migrate the table using:
php artisan migrate
Now, let's go over the steps of building the API...
Step 2: Scaffold UI With Laravel UI Package
The Laravel UI package provides a minimal and simple starting point for building a Laravel application with authentication and a basic ui. Instead of having to build authentications for your login/register page, the package would handle it for us.
Note: You can use Laravel Breeze as well if you prefer that. The process should be similar
Install Laravel UI via Composer:
                    composer require laravel/ui
                    php artisan ui:auth
I won't bother styling the login and register page as that isn't related to what we are doing.
Step 3: Restrict Registration to Only One User Using Middleware
As I said previously, the first user that registers would take the Admin role, so, we need to restrict registration access to only one user.
We can do this using Laravel Middleware, create one like so:
php artisan make:middleware RestrictRegistrationToOneAdmin
The above would be placed under simpleblog/app/Htpp/Middleware
Note: simpleblog is the name of the laravel application, so, yours might be different.
Inside the RestrictRegistrationToOneAdmin,
add the following in the handle() method:
                    namespace App\Http\Middleware;

                    use App\Models\User;
                    use Closure;
                    use Illuminate\Http\Request;
                    use Illuminate\Support\Facades\DB;

                    public function handle(Request $request, Closure $next)
                    {
                        $user = DB::table('users')->select('role')->where('id',1)->first();

                        if ($user && (int)$user->role === 1){
                            // fail and redirect silently if we already have a user with that role
                            return redirect("/");
                        }

                        return $next($request);
                    }
Since the admin should be the first user in the table, we can check if it has role 1 (which would be for admin), if so, we redirect back to the homepage. This would only take effect if a user has been created.
The middleware would be added to the registration route, but before you do, assign the middleware a key in the applications app/Http/Kernel.php file.
                protected $routeMiddleware = [
                    // Other middleware here
                    // ...
                    'verified' => \Illuminate\Auth\Middleware\EnsureEmailIsVerified::class,
                    'restrictothers' => \App\Http\Middleware\RestrictRegistrationToOneAdmin::class // <— add this
                ];
Once the middleware has been defined in the kernel, we can use the middleware method to assign middleware to a route. Open routes/web.php, and add the following under the Auth::routes();
                use App\Http\Controllers\Auth\RegisterController;
                use Illuminate\Support\Facades\Auth;
                use Illuminate\Support\Facades\Route;

                Auth::routes();
                // Add this ↓
                Route::post('register', [RegisterController::class, 'register'])
                    ->middleware('restrictothers');

                // This serves as the create token page
                Route::get('dashboard', function () {
                    if(Auth::check() && Auth::user->role === 1) {
                        return auth()
                            ->user()
                            ->createToken('auth_token', ['admin'])
                            ->plainTextToken;
                    }
                    return redirect("/");

                })->middleware('auth');
Once you register or login as an admin, you'll be redirected to the dashboard page, in the closure, we check if the user is authenticated and is the admin. If so, we create and return the API token.
Once you have added that, simply clear the route cache in your console by running the following:
php artisan route:cacheStep 4: Issuing and Revoking The Admin User Token
Visit the /register route. Once you have successfully registered, you'll be presented with a token. Copy the token and exist the page.
Note: As long as you are logged in, every visit to the dashboard route would create a new token.
You can make this intuitive by creating a button that would generate the token.
To revoke the token, you can do something as follows in routes/web.php
                Route::get('clear/token', function () {
                    if(Auth::check() && Auth::user()->role === 1) {
                        Auth::user()->tokens()->delete();
                    }

                    return 'Token Cleared';
                })->middleware('auth');
As soon as you visit the clear/token route, and you are the admin, you can clear the token. Again, this is just an example, you can create a remove button that would revoke the tokens when clicked.
Step 5: Creating and Restricting The API Endpoint
Open routes/api.php and add the following endpoints (these are the endpoints we outlined earlier before):
                use App\Http\Controllers\ControllerExample;
                use Illuminate\Http\Request;
                use Illuminate\Support\Facades\Route;

                Route::group(['middleware' => 'auth:sanctum'], function() {
                    // list all posts
                    Route::get('posts', [ControllerExample::class, 'post']);
                    // get a post
                    Route::get('posts/{id}', [ControllerExample::class, 'singlePost']);
                    // add a new post
                    Route::post('posts', [ControllerExample::class, 'createPost']);
                    // updating a post
                    Route::put('posts/{id}', [ControllerExample::class, 'updatePost']);
                    // delete a post
                    Route::delete('posts/{id}', [ControllerExample::class, 'deletePost']);
                    // add a new user with writer scope
                    Route::post('users/writer', [ControllerExample::class, 'createWriter']);
                    // add a new user with subscriber scope
                    Route::post(
                        'users/subscriber',
                        [ControllerExample::class, 'createSubscriber']
                    );
                    // delete a user
                    Route::delete('users/{id}', [ControllerExample::class, 'deleteUser']);
                });
Route groups allow you to share route attributes across a large number of routes without needing to define those attributes on each individual route.
In this case, we are sharing the "auth:sanctum" middleware by restricting the endpoints to only authenticated user.
Being authenticated doesn't mean the user would be authorized, authenticated is just to be sure the user authenticating is via the sanctum guard, and authorization is the next thing that happens after authentication, should the user be allowed to access the resources?
We are going to scope the resources by leveraging sanctum abilities, this would determine if the user is actually authorized to access the resources.
Step 6: Creating The API Controller Methods
Before creating the methods, let's create a trait that would be used for common functionality, I'll create a trait AiHelpers.php (you can create a folder named Library in the app/Http directory and place the file in there) with the following methods:
                    namespace App\Http\Library;

                    use Illuminate\Http\JsonResponse;

                    trait ApiHelpers
                    {
                        protected function isAdmin($user): bool
                        {
                            if (!empty($user)) {
                                return $user->tokenCan('admin');
                            }

                            return false;
                        }

                        protected function isWriter($user): bool
                        {

                            if (!empty($user)) {
                                return $user->tokenCan('writer');
                            }

                            return false;
                        }

                        protected function isSubscriber($user): bool
                        {
                            if (!empty($user)) {
                                return $user->tokenCan('subscriber');
                            }

                            return false;
                        }

                        protected function onSuccess($data, string $message = '', int $code = 200): JsonResponse
                        {
                            return response()->json([
                                'status' => $code,
                                'message' => $message,
                                'data' => $data,
                            ], $code);
                        }

                        protected function onError(int $code, string $message = ''): JsonResponse
                        {
                            return response()->json([
                                'status' => $code,
                                'message' => $message,
                            ], $code);
                        }

                        protected function postValidationRules(): array
                        {
                            return [
                                'title' => 'required|string',
                                'content' => 'required|string',
                            ];
                        }

                        protected function userValidatedRules(): array
                        {
                            return [
                                'name' => ['required', 'string', 'max:255'],
                                'email' => ['required', 'string', 'email', 'max:255', 'unique:users'],
                                'password' => ['required', 'string', 'min:8', 'confirmed'],
                            ];
                        }
                    }
All the methods in the trait above are commented, however, in the isAdmin, isWriter, and isSubscriber, I leveraged the tokenCan method, this is a Sanctum method that checks if the token has a given ability, it returns true if the token has the specified ability.
We've created the "admin" ability when we created the admin user, we would create the "writer" ability when registering writer users, and the "subscriber" ability when registering subscriber users.
In the ControllerExample, I'll add the following:
                    namespace App\Http\Controllers;

                    use App\Http\Library\ApiHelpers;
                    use App\Models\Post;
                    use App\Models\User;
                    use Illuminate\Http\Request;
                    use Illuminate\Support\Facades\DB;
                    use Illuminate\Support\Facades\Hash;
                    use Illuminate\Support\Facades\Validator;
                    use Illuminate\Http\JsonResponse;
                    use Illuminate\Support\Str;

                    class ControllerExample extends Controller
                    {
                        use ApiHelpers; // <---- Using the apiHelpers Trait

                        public function post(Request $request): JsonResponse
                        {

                            if ($this->isAdmin($request->user())) {
                                $post = DB::table('posts')->get();
                                return $this->onSuccess($post, 'Post Retrieved');
                            }

                            return $this->onError(401, 'Unauthorized Access');
                        }

                        public function singlePost(Request $request, $id): JsonResponse
                        {
                            $user = $request->user();
                            if ($this->isAdmin($user) || $this->isWriter($user) || $this->isSubscriber($user)) {
                                $post = DB::table('posts')->where('id', $id)->first();
                                if (!empty($post)) {
                                    return $this->onSuccess($post, 'Post Retrieved');
                                }
                                return $this->onError(404, 'Post Not Found');
                            }
                            return $this->onError(401, 'Unauthorized Access');
                        }

                        public function createPost(Request $request): JsonResponse
                        {

                            $user = $request->user();
                            if ($this->isAdmin($user) || $this->isWriter($user)) {
                                $validator = Validator::make($request->all(), $this->postValidationRules());
                                if ($validator->passes()) {
                                    // Create New Post
                                    $post = new Post();
                                    $post->title = $request->input('title');
                                    $post->slug = Str::slug($request->input('title'));
                                    $post->content = $request->input('content');
                                    $post->save();

                                    return $this->onSuccess($post, 'Post Created');
                                }
                                return $this->onError(400, $validator->errors());
                            }

                            return $this->onError(401, 'Unauthorized Access');

                        }

                        public function updatePost(Request $request, $id): JsonResponse
                        {
                            $user = $request->user();
                            if ($this->isAdmin($user) || $this->isWriter($user)) {
                                $validator = Validator::make($request->all(), $this->postValidationRules());
                                if ($validator->passes()) {
                                    // Create New Post
                                    $post = Post::find($id);
                                    $post->title = $request->input('title');
                                    $post->content = $request->input('content');
                                    $post->save();

                                    return $this->onSuccess($post, 'Post Updated');
                                }
                                return $this->onError(400, $validator->errors());
                            }

                            return $this->onError(401, 'Unauthorized Access');
                        }

                        public function deletePost(Request $request, $id): JsonResponse
                        {
                            $user = $request->user();
                            if ($this->isAdmin($user) || $this->isWriter($user)) {
                                $post = Post::find($id); // Find the id of the post passed
                                $post->delete(); // Delete the specific post data
                                if (!empty($post)) {
                                    return $this->onSuccess($post, 'Post Deleted');
                                }
                                return $this->onError(404, 'Post Not Found');
                            }
                            return $this->onError(401, 'Unauthorized Access');
                        }

                        public function createWriter(Request $request): JsonResponse
                        {
                            $user = $request->user();
                            if ($this->isAdmin($user)) {
                                $validator = Validator::make($request->all(), $this->userValidatedRules());
                                if ($validator->passes()) {
                                    // Create New Writer
                                    User::create([
                                        'name' => $request->input('name'),
                                        'email' => $request->input('email'),
                                        'role' => 2,
                                        'password' => Hash::make($request->input('password')),
                                    ]);

                                    $writerToken = $user->createToken('auth_token', ['writer'])->plainTextToken;
                                    return $this->onSuccess($writerToken, 'User Created With Writer Privilege');
                                }
                                return $this->onError(400, $validator->errors());
                            }

                            return $this->onError(401, 'Unauthorized Access');

                        }

                        public function createSubscriber(Request $request): JsonResponse
                        {
                            $user = $request->user();
                            if ($this->isAdmin($user)) {
                                $validator = Validator::make($request->all(), $this->userValidatedRules());
                                if ($validator->passes()) {
                                    // Create New Writer
                                    User::create([
                                        'name' => $request->input('name'),
                                        'email' => $request->input('email'),
                                        'role' => 3,
                                        'password' => Hash::make($request->input('password')),
                                    ]);

                                    $writerToken = $user->createToken('auth_token', ['subscriber'])->plainTextToken;
                                    return $this->onSuccess($writerToken, 'User Created With Subscriber Privilege');
                                }
                                return $this->onError(400, $validator->errors());
                            }

                            return $this->onError(401, 'Unauthorized Access');

                        }

                        public function deleteUser(Request $request, $id): JsonResponse
                        {
                            $user = $request->user();
                            if ($this->isAdmin($user)) {
                                $user = User::find($id); // Find the id of the post passed
                                if ($user->role !== 1) {
                                    $user->delete(); // Delete the specific user
                                    if (!empty($user)) {
                                        return $this->onSuccess('', 'User Deleted');
                                    }
                                    return $this->onError(404, 'User Not Found');
                                }
                            }
                            return $this->onError(401, 'Unauthorized Access');
                        }
                    }
Don't fret, here is an explanation of what each method is doing
-
post(Request $request) - This checks if the user authorizing as an Admin token ability, if so, we return all created posts. If otherwise, we return an unauthorized error.
-
singlePost(Request $request, $id) - This checks if the user authorizing as an Admin or Writer or Subscriber token ability, if so, we return the specified post the user is requesting. If the post is not found, we return a 404 error.
-
createPost(Request $request) - We only want to give Admin and Writer access to create a post, so, we check if the requesting user has the both abilities, if so, we do some validation, if validation passes, we create the Post, if it fails, we return an error. If the user authorizing doesn't have the ability we are requiring, we return an Unauthorized error.
-
updatePost(Request $request, $id) - This is similar to the createPost method except that we are simply updating the Post data.
-
deletePost(Request $request, $id) - This is also similar to the createPost method except this time, we are deleting a Post data
-
createWriter(Request $request) - We only want to give Admin access to create a new writer user, so, we check if the request user has the admin ability, if so, we create the user (We are giving the user role 2, admin is role 1, however, this doesn't matter in this case). The most important thing is that as soon as the user is created, we return a token and tag it with the writer ability.
-
createSubscriber(Request $request) - Similar to the createWriter method, except this time, we tag the token ability a "subscriber".
-
deleteUser(Request $request, $id) - This first checks if the user authorizing as an Admin token ability. We restrict the ability to delete the admin user (you can change this) by checking if the role is not set to 1, if that is true, we delete the user.
Having done that, we can now move to testing.
Step 7: Testing The API In Insomnia
If you are not using Insomnia, feel free to use anyone you prefer.
Creating a New Post
Start by creating a new POST request (click the plus icon, or use keyboard command+N or control+N on Windows/Linux), and give it a name of your choosing.
In the text field next to the word "POST", enter in the API endpoint you'd like to work with, since we are creating a post, we can use the following endpoint: /api/posts
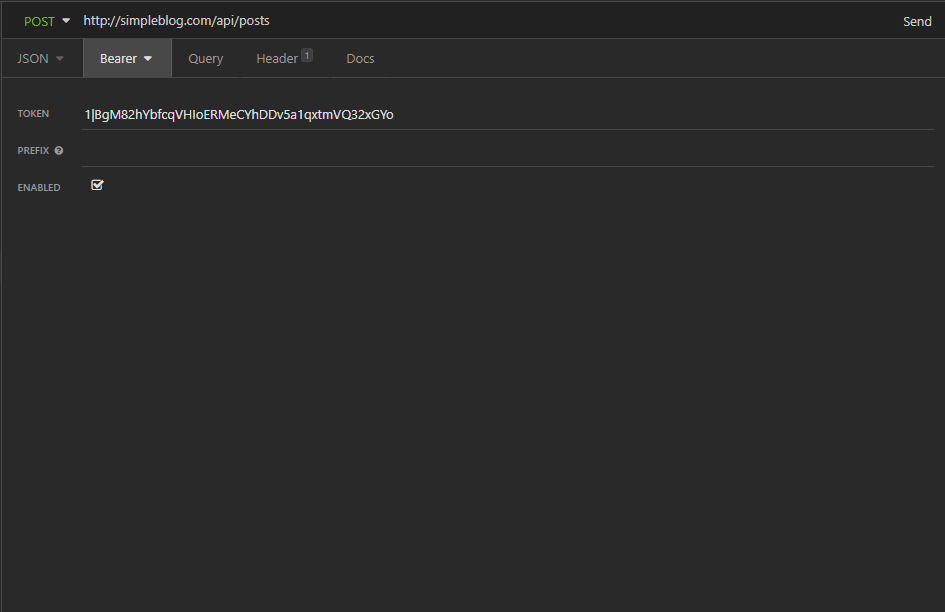
In the "Auth" dropdown menu, select "Bearer Token", add the admin token like so:
Next, select the "Body" tab. From the dropdown menu, select "JSON":
+-+Laravel+Sanctum.png)
You can then create a post using the title and content key, e.g:
{
    "title":"This is a new post title",
    "content":"This is an new body"
}
Hit the send button to create the post, if successful, you should get a success with the returned data ( The response will appear in the pane on the right) of the post that you just created:
+-+Laravel+Sanctum.png)
The green rectangle that reads "200 OK" indicates that your request returned with a status of 200, which means it was successful. Feel free to create more post with different post title and content
Updating a Post
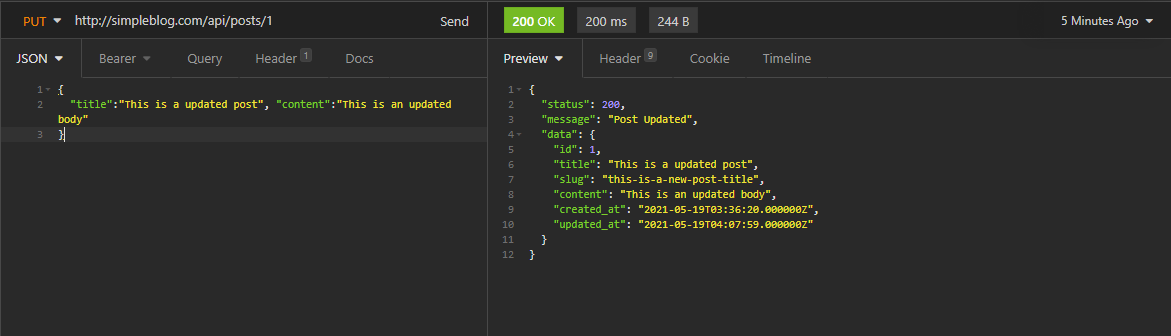
To update a post, change the method from POST to PUT, specify the id of the post you want to update, for example, we just created our first post, to mpdify the post data, I'll target the following endpoint: /api/posts/1
Then make your changes in the JSON body:
{
    "title":"This is a updated post",
    "content":"This is an updated body"
}
Hitting send would update the post and return a success coupled with the updated Post data if done as specified:
Get a Post
To get a post, change the method to GET, specify the id of the post you want to get, for example, I can get the post with the id of 1 using the following endpoint: /api/posts/1
Hit the send button, and you should get the post if it exist:
.png)
Try getting a post that doesn't exist, and you should get a 404 error:
.png)
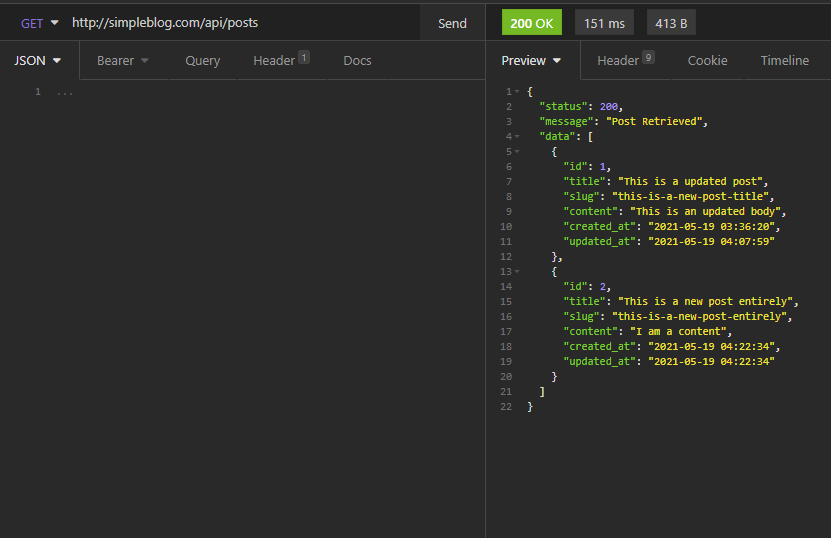
Get All Posts
To get all post, use a GET method to /posts endpoint:
Create a New Writer User
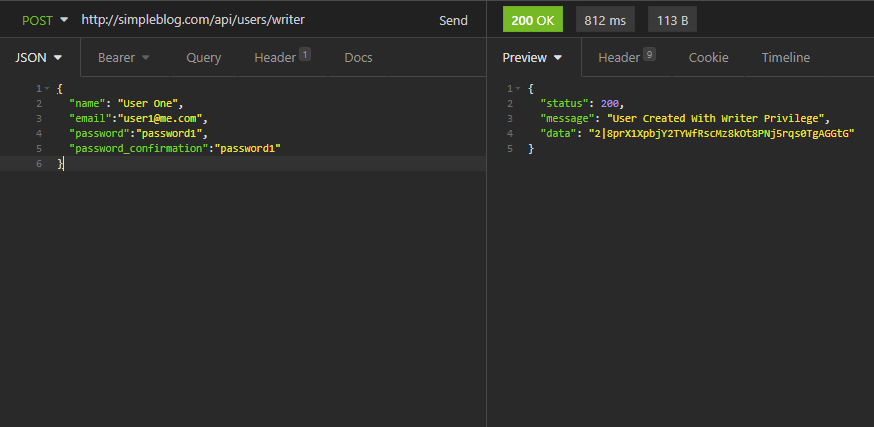
Use a POST method to /users/writer endpoint, and add the user you want to register in the JSON body like so:
{
    "name": "User One",
    "email":"user1@me.com",
    "password":"password1",
    "password_confirmation":"password1"
}
Hitting the send button should return the token (behind the scene, this token is tagged with writer ability):
Any writer user can create, update, read and delete a post only.
Create a New Subscriber User
Use a POST method to /users/subscriber endpoint, and add the user you want to register in the JSON body like so:
                {
                    "name": "User Subscriber",
                    "email":"usersubscriber@me.com",
                    "password":"password2",
                    "password_confirmation":"password2"
                }
Hitting the send button should return the token (behind the scene, this token is tagged with subscriber ability:)
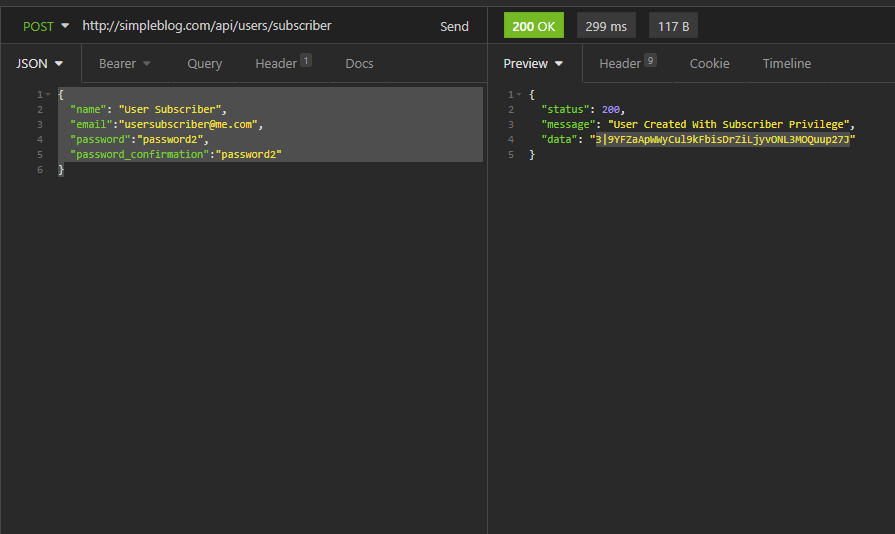
Subscriber users can only read a post.
Conclusion
This would conclude our guide on creating a multiple role-based API authentication With Laravel Sanctum. We covered a lot in this guide, and I hope you not only enjoyed the guide, but you understood it. Let us know if you have any questions.